
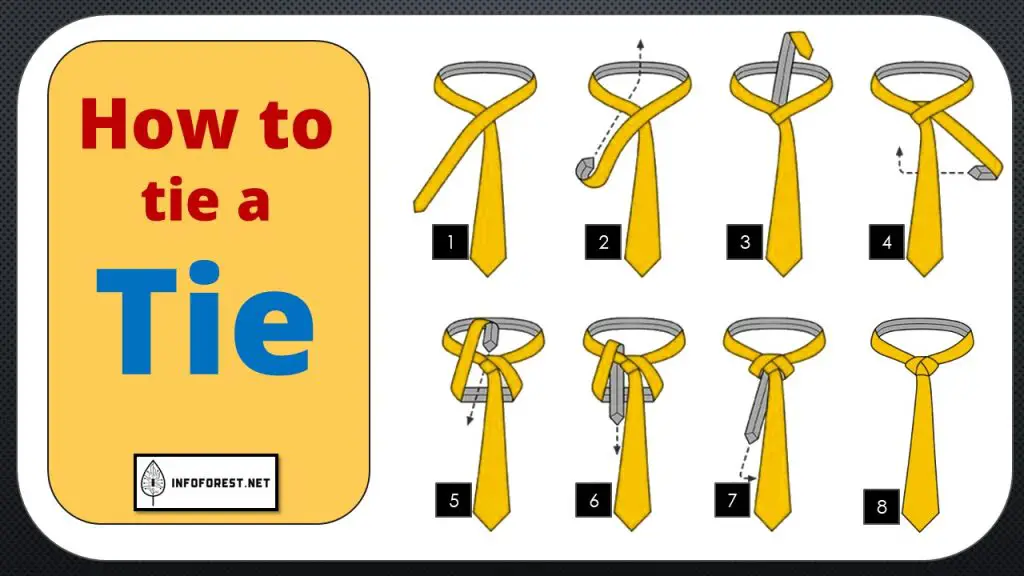
Every man should know how to tie a tie, even the most famous models in the world seem to have a hard time with this task, because tying a tie seems like a confusing task at first glance, but in reality, it is not. That’s why Infoforest has created this simple, short guide with infographics and lots of helpful ideas.
In the How to tie a Tie article, with the help of pictures and explanations, we will show you 5 different types of knots that you can use at business meetings, parties, and weddings.
Atlantic knot
A casual tie knot that can be tied in a few easy steps is the Atlantic knot, also known as the cafe knot and Ventaglio knot. Instead of patterned or striped ties, this knot works better with solid-colored ties.
The Atlantic tie knot adds a youthful look to your attire. It is ideal for festive and social occasions. Depending on how comfortable you feel with it, you can also wear it to work. It is usually not suitable for formal occasions. It can be worn by both men and women. Choose a simple, flexible, and thin material for your tie. You can think of it as a reverse Pratt knot.
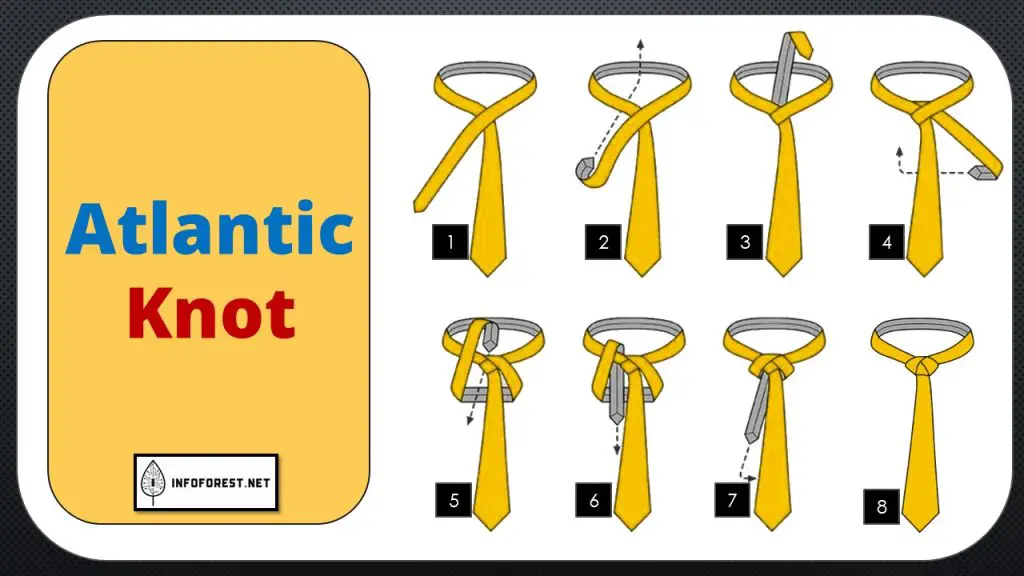
How to tie Atlantic knot
1- The thin end of the tie should be crossed over the thick side.
2-Pass the thin side of the tie-up and around the collar, then pass it back down over the knot to cross the end on the other side.
3-Bring the end of the tie horizontally to the opposite shoulder and pass it under the knot.
4-Now bring the end back over the front of the tie.
5-Staying on the same side of the knot, pass the end of the tie-up and under the collar before passing it back down and over the collar.
6-Pass the end of the tie under the knot back to the opposite shoulder.
7-Take the tie and pass it through the back loop of the knot, up and over the neck loop, and then back down and under the collar.
8-Tighten and straighten the Atlantic knot.
9-The Pratt knot is the reverse of the Atlantic knot.
Balthus knot
The Balthus knot is the perfect accessory to complete your look. Take some time to tie this knot, as it is similar to a beautiful Windsor knot but more difficult.
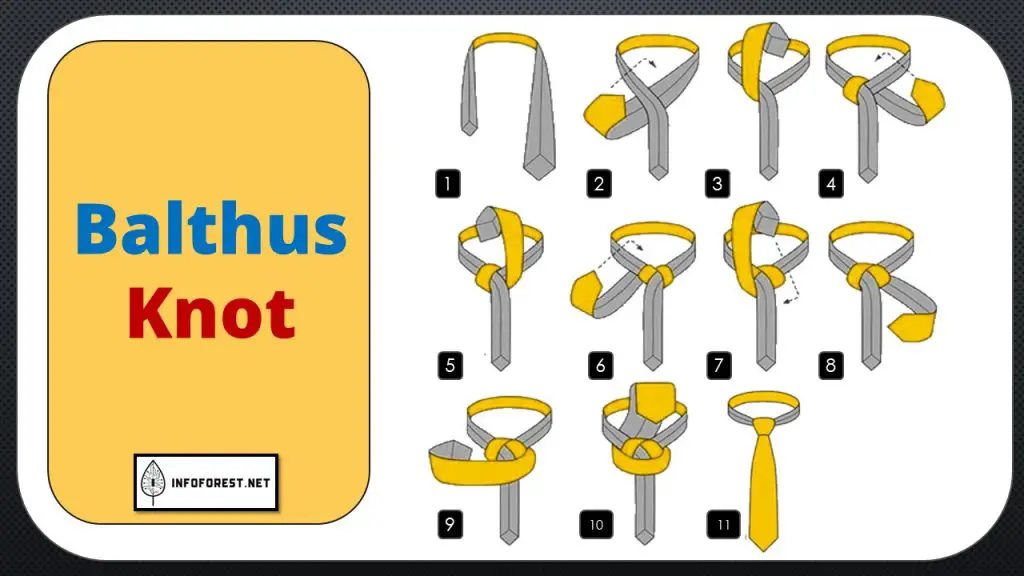
How to tie a Balthus knot
1- The tie should be worn around the neck with the back facing out.
2- Connect the two ends of the tie crosswise by placing the thinner end over the thicker end.
3- Pull the tie through the collar and to the other side, and bring the thick side of the tie-up over the neck loop and back under the collar.
4- Bring the tie to the other side by passing it through the collar once more.
5- Repeat the process, passing the tie through the collar and switching to the other side.
6- Bring the end of the tie-up and over the back of the knot by pulling the tie over the front and then behind the knot.
7-Put the end of the tie through the loop you made in the previous step.
8- Tighten the knot by pulling the tie through.
Onassis knot
Have you ever had a tie that looked so darn good that you did not want to ruin it by tying a knot? Then the Onassis knot is the ideal solution. You cannot even see this knot because the tie has hidden it. And of course, the style is named after Aristotle Onassis, Jackie Kennedy’s second husband after JFK’s death. The knot is associated with him, even though he did not invent it and was not the first to wear it.
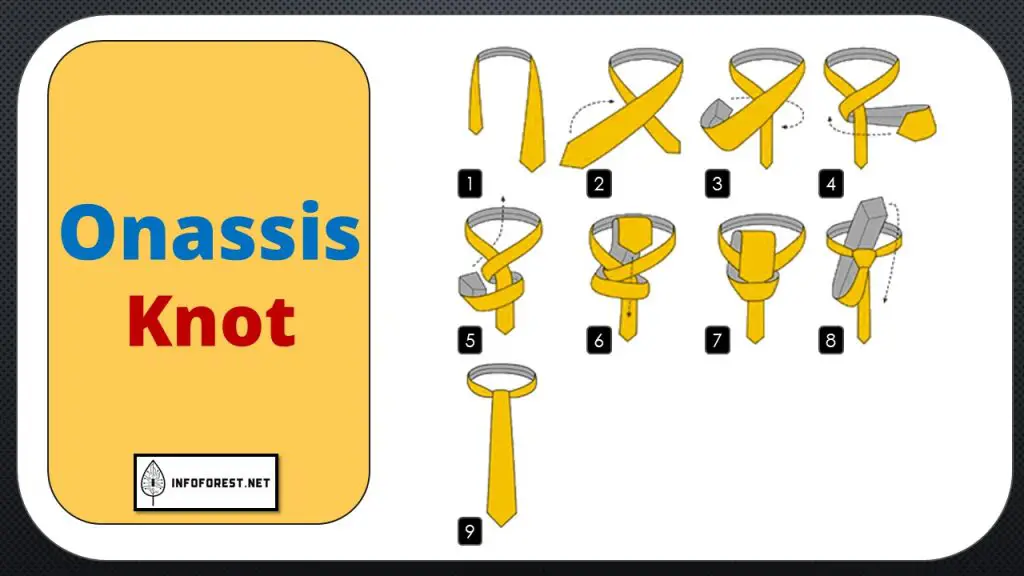
How to tie an Onassis Tie
1- Bring the tie to the opposite shoulder and place the thicker side over the thinner side.
2- Turn the tie over by sliding the thicker side under the thinner side.
3- Bring the tie back to the opposite shoulder and place it over the top of the cross-section again.
4- Pull the thicker side of the tie under the collar, then lower it back down through the top loop of the knot.
5- Pull the knot tight. Pull the end of the tie-up under the collar, around the knot, and back down, using the front tab as a guide. Now that the knot is covered, the tie will look a little like a necktie. You can either leave the tie alone or add a fancy tie pin.


Cape Knot
The cape knot is eye-catching because it looks sophisticated. Paisley ties, patterned ties, and plain ties go very well with this knot. Because of the difficulty of the knot, patterned ties can have a slightly bigger “wow” effect.
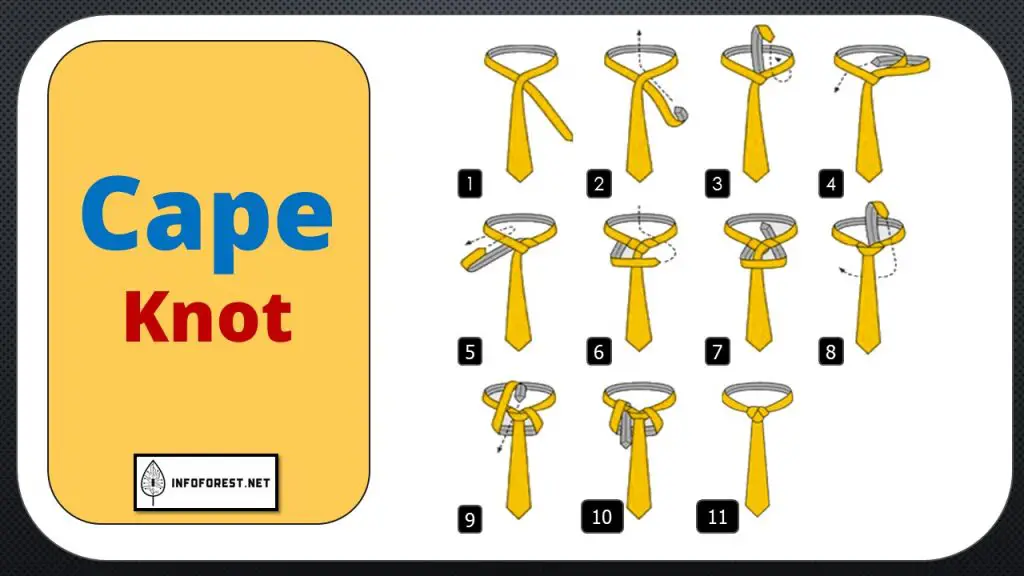
How to tie a Cape knot
1- Pull the thinner end of the tie under and over the collar after placing it over the front of the tie.
2- Wrap the end of the tie under the front piece and hold the end to the side.
3- Pull the end back down and over the front of the tie after pulling it up and over the collar.
4- Tuck the end behind and over the collar once more.
5- The end of the tie is turned around by crossing it under and over the collar
6-Pass the end on the back of the tie through the last loop you created.
7-Align the tie and pull it tight. You now have three separate parts of the knot, all vertical.
Double square knot
The double square knot, also called the double knot, has little in common visually with the square knot (also called the Christensen knot). This tie knot is suitable for both business situations and regular use. It is also very easy to tie. A double square knot can be made in a few simple steps.

How to tie a Double square knot
1-Cross the thick side of the tie over the thin side.
2-Bring the tie back up after bringing it horizontally under the crossing point.
3-Wrap the tie around the knot two more times and finish on the side where you started.
4-Pass the tie-up and through the top loop of the knot, then back down and through the bottom loop.
5-Straighten the tie and tie it tightly.
We also invite you not to miss our other popular articles such as:
How to lose weight fast, How Many Ounces in a Gallon
and How To Delete Instagram Account.